Search This Blog

Sunday, September 20, 2009

Purse Organizer


I saw a long time ago on late night infomercial TV, a commercial for a purse organizer. They sold it as a great way to keep track of things, but to me it is a great way to take the essentials from one bag to another - very important for me right now not because I have so many handbags, but because I don't want to carry my purse to night school when I have plenty of room in my backpack - thus I made a mini purse organizer.

Step 1 was to figure out how big - I laid out the items that I need to keep in my purse and want to take to class. I then allowed for 1/2" seam (1/4" seam allowance on each of the sides). I also allowed space for the bulk of the items in each pocket. I then wanted to fold the organizer up to make the pockets about 3 inches.

Cutting the fabric - for my organizer, I used 2 pieces (one liner and one for the outer fabric) of fabric that measured 21" x 9" plus I used a piece of receiving blanket also 21" x 9" instead of interfacing - still trying to get rid of all this nursery flannel and using it in place of interfacing where I can.

Lay the right sides together of the liner and the outer fabric, then place the interfacing/receiving blanket on top of wrong side of the liner. Stitch together with a 1/4" seam allowance around all sides, leaving a 2" gap at the bottom for turning.

Clip corners and trim seam allowance, then turn inside out. Press, then edge stitch the entire rectangle. Fold 3" from the bottom up with the liner fabric facing you so that the liner stays on the inside. Stitch the left and right side so you have one big pocket. Measure where your pockets will go, mark with chalk and pin in place. Sew each line from bottom to top.


Place your goodies in the pockets, then wrap either around itself, or you can place it so that the items line the bag instead of wrapping around itself. Now you can easily transfer bags, or easily find your stuff in the pockets.

Thursday, September 17, 2009

Aloo Gobi (Indian potatoes and cauliflower)


I have lost touch with an Indian friend of mine who had me over for dinner one day when his mom was in town. She made the best aloo gobi I have ever had and shared the recipe with me. I have not made it in years, but was craving this yesterday. I cannot find the recipe now and am quite bothered by this because there were two other recipes that she gave me that I loved as well. I searched high and low on the internet and in the Joy of Cooking, and could not find anything that had all the same ingredients that I remembered hers having, so this is a compilation of a several recipes and an experiment that went very well this afternoon. My friend's mom's recipe was much drier than this one, so there will be further experiments - this has canned tomatoes to make it stew like.

Aloo Gobi

Ingredients:
1/4 cup grapeseed oil (or other light oil with high smoke point)
1 large onion, chopped
1/2 tsp cumin powder
1 bunch fresh cilantro - separate stalks from leaves - fine chop stalks and rough chop leaves
2 tsp turmeric
1 tsp sea salt
1 tsp red pepper flake - adjust to taste
20 oz can crushed tomatoes and juices
1 head cauliflower - with florets separated into bite size pieces
5 medium potatoes - cut into 1/2 inch cubes
1 cup water
1 inch piece of ginger, minced
4 cloves garlic, minced

Directions
Heat oil in dutch oven - add the chopped onion and cumin to the oil. Saute until translucent.
Add chopped cilantro stalks, turmeric, sea salt and red pepper flake. Mix until well incorporated - almost to a paste.
Add tomatoes, ginger and garlic - stir thoroughly
Add potatoes and cauliflower - Add water and stir
Cover and simmer for 20 minutes or until potatoes are cooked through
Add cilantro leaves
Turn off heat, cover and leave for about 30 minutes (if you can wait that long) The longer this stews, the better. If you can't wait, it is pretty tasty fresh from the stove too.

This is prior to stewing without heat, but still on the burner.

My son's portion - he wanted me to take a picture of his food since I took a picture of my food. This was too hot for him - next time, I'll probably use about 1/8 - 1/4 tsp of red pepper flake. I used red pepper flake instead of a chili thinking I could better control the heat.

Saturday, September 5, 2009

Cat toy tutorial

It seems that the kitties were not getting any love around here lately so I decided to use some of my scrap receiving blanket stash to make them a toy. I thought about making a simple ball, but then found this great rat toy template from Martha Stewart. The pattern is for a felt rat that is hot glued together. My cats would destroy that in minutes, so I opted to sew it, put some felt ears on it, fill it with catnip and fiberfill, and put a rope tail on it.

This is my first tutorial so please provide feedback and ask questions. I do recommend if you make this, make sure the kitties are not in the sewing room because they could not wait for it to be finished.


You can make this from scrap - I used a small rectangle of receiving blanket and about an inch square of felt for the ears. You also need a 3 inch piece of rope for the tail, a tablespoon of catnip, and two big handfuls of polyfil. Pattern pieces cut out - then I realized I have two of the same side so I cut a reverse of the rat side shape.


Cut a slit halfway into the ear, then fold over about 1/4". I then sewed a V shape into the ear so it would stick up a little bit.


Place right sides together of the two rat sides and sew with about 1/4" seam allowance - I did 1/8" so the rat would be bigger.

Turn the two sides right sides out, then mark two eyes and a nose with either chalk or a water soluble marker. I used the button hole foot (accidentally) but it worked really well. I did a very tight zig zag stitch for the eyes and the nose. This rat has no mouth, but you could add one - I just couldn't picture the rat's expression since I knew this was going to be a toy to torment kitties.

Turn inside out and sew the bottom on and leave about 2" at the base of the tail for turning and for stuffing.

Turn the mouse right side out, fill the nose with at least 1 Tbls of cat nip, then stuff with a washable polyfill. As you can see, the one kitty was ready for this to be done right away. They love catnip. My son had a great time stuffing the toy.

More stuffing - we used a chopstick to press it into the edges and get the mouse into shape. Stuff it loosely, not too full.

Once you finish stuffing, take a piece of rope about 3 inches long, insert into the opening. Tie a knot into the end of the rope. (Don't worry about the end past the knot fraying. Any products to prevent fraying would be toxic to the kitty.) Pin the rope into place so it does not move while you reinforce your seams. Fold the ends by the tail in and edge stitch around the rat on all sides. Reinforce the tail - sew straight over it a few times - this will be tugged on so you do not want to rat falling apart at the tail after you reinforced all those seams.

Final rat - cute little thing.

First examination of the toy... and to see who would win first chance at the kill...

And once it was caught... I am really glad I reinforced the tail because he started pulling on it with his teeth and pushing on the body - he was determined to pull the thing apart but it has held up for hours of play!

Train Shoe Holder


This was a really fun project. With each new project, I learn a lot of lessons on what I would do next time, and this was no exception, except that I doubt I will make this one again, but who knows...

I got the pattern and instructions from the book Sew It Tonight, Give It Tomorrow, which ironically took me about 4 nights to finish. My son already loves it and kept checking on my progress daily. "Is the choo cho train finished now, mommy?" What better motivation than to have your two year old check on a project. Now having been a project manager in my previous life, and having these sort of projects - I will say that having a deadline slip with a two-year old is more intimidating than the call to a client to say that a deadline has slipped.


Shoe holder in action - my toddler loves putting things away so this is perfect because he didn't have anywhere that his shoes belonged other than the floor of his closet. Another step toward independence!

I had to include this because the cat really enjoyed this project too. This was the felt for the train wheels, and other black parts. There is enough left over from this and the car fleece from the car organize project that I can make another kitty bed.

Wednesday, August 5, 2009

Marbled Paper

I found a post earlier last week on how to marble paper. It seemed very complicated based on the post, so I decided to simplify and make it toddler friendly. The original post is over at Design Sponge. My simplified instructions are below:

Materials and tools:

  • Acrylic Paint
  • Paper - cardstock and printer paper
  • 2 cups liquid starch
  • 2 tsp cream of tartar
  • large glass baking dish that will fit paper
  • Chopstick or bamboo skewers
  • Newspaper or vinyl tablecloth for work area

Process:

  • Step 1: Mix cream of tartar and liquid starch into the glass baking dish. I mixed both in a large measuring cup first so I could get the cream of tartar well incorporated, then poured into the baking dish.
  • Step 2: Add drops of acrylic paint to the baking dish. Some may fall to the bottom. The folks over at Design Sponge gave great tips on how to avoid this, but we were having too much fun to worry about that.

  • Step 3: Drag chopstick or skewer through the paint making swirls and designs. This is what will transfer to your paper.
  • Step 4: Place paper into baking dish for a few seconds, making sure you get the entire piece of paper to touch the starch.
  • Step 5: Remove paper, and set aside for a few seconds (this is why you need the vinyl tablecloth so you can set the paper down and not care about your surface.)
  • Step 6: Take the paper to the sink and thoroughly rinse the starch from the paper. The paint will not rinse away.

  • Step 7: Layout the paper to dry
  • Step 8: Iron the paper flat


Below are two samples from the batch we did. Some were very vibrant and swirly, others were faint and subtle patterns.

Saturday, August 1, 2009

Poor Lil' "Pumato" Bug

In our home, it has become customary over the years to remove any critter who finds there way into our home and put them outside. I say any critter, but truth of the matter is that this privilege has been reserved for amphibians, spiders, ladybugs, and a few other beneficial insects. Never before has this great honor been bestowed upon the infamous palmetto bug. If you live in Florida, you know how often these bugs come into houses and it has no bearing on your housekeeping skills. They come into the house in summer looking for water, they come into the house in the winter to avoid the cold. There is not much that can stop them. Many people refer to them as roaches.

This evening, as I went into the bathroom to check on a noise, I noticed a medium sized palmetto bug over by the shower. My typical reaction would be to look away and pretend I didn't see it, or to size it up and see if there would be a chance I could flush it. My son came into the bathroom right at this time, and walks right up to the bug.

He says, "Oh, poor lil bug."

I said, "yes, poor little bug." Obviously the little bug was sick because he had not moved much in the time we had been observing him. My son then asks if it is a big lady bug.

I said, "No - this is a palmetto bug." He squats down right beside the bug and looks like he is about to pet it, but instead just squats and looks.

He says, "I think he's dying." I concur and ask him what should we do about it.

He says "Awwww, poor lil pumato bug, he's dying."

I said, "Yes, he is dying and probably will not make it much longer."

My son then goes to get a cup from the bathroom counter, hands it to me and says, "He needs to go be with his family outside."

I tell him "Yes, we can take him outside to be with his family."

He repeats "He needs to be with his family so he can die."

So we coerced the "pumato" bug into the cup, carried him outside and placed him in a pile of mulch where my son believes the bug's family lives. As we head back into the house, he says "goodnight pumato bug."

I had no idea that we had taught our son that it is best to be with family when you are sick, and absolutely when you are dying. Simple lessons happen everyday.

Friday, July 17, 2009

Natural Homemade Deodorant


5 - 6 Simple Ingredients to make a natural and homemade deodorant - and yes, it works, even in this hot, hot Florida humid summer.

Ingredients:
1/4 cup Aloe Juice (or water)
1/4 cup Grain Alcohol, or Vodka
1/2 Tbls Chlorophyll
Zest of 1 Lemon
3 - 5 drops of Lavender Oil (or your favorite essential oil - pick one that compliments lemon)
3 drops Grapefruit Seed Extract (optional)

Yields 4 oz

Put all ingredients in a glass jar and let sit for 24 hours. Strain lemon zest, then pour into a 4 oz or larger spray bottle. Apply by spraying under arms. The alcohol content in this is no more than most other deodorants, so you can even use this right after shaving. The aloe helps for sensitive skin, but water works just fine.

What does each ingredient contribute:
  • Aloe Juice soothes sensitive skin and dilutes the alcohol
  • Alcohol helps extract the lemon zest and essential oils from the zest
  • Chlorophyll is the active deodorizing ingredient - some people take it internally to reduce all sorts of funky smells
  • Lemon is also deodorizing, plus the acid is neutralizing to sweat and it has a nice clean smell
  • Lavender Oil is antiseptic, cooling and mild
  • Grapefruit Seed Extract (GSE) is a preservative and anti-fungal and anti-bacterial. If you do happen to get a little funky in your pits, a little GSE will kill the bacteria, yeast, or whatever fungus you may have developed. The formula stays fine in a bottle for 6 weeks so you do not have to use GSE.
This is a pretty frugal formula too. I have not calculated the cost per batch yet, but I estimate it to be around $1 for the 4 oz which lasts me 6 weeks. Please note that in very hot and humid weather, or based on how much you personally sweat, you may have to reapply during the day. This formula is not very effective for workouts - but I have yet to really find something that is.

Car Organizer Project

Nothing repurposed here - just a need to organize all the toys that have taken over the entire backseat of the car.

I took my son to the fabric store so he could pick out the fabrics and ribbons for this project. When I got home, I was able to complete this project in about 2 hours - 90 minutes of naptime and about 30 minutes after bedtime:)

This is a Joann Fabrics project - although next time I would have sewn the pieces together rather than use Heat N' Bond tape - I think it would have been just as easy because fleece does not seem to take to that stuff well. Also, I fear that with some minor wear, it may come apart, but maybe I am wrong....

4 pieces prepped for assembly


Final project laid out to torment kitties (one was camera shy - they other can't stand the ribbon)


Final product filled with toys. The bottom pocket is under the seat so might not be too practical at the moment, but it was large enough to fill with a few books.

On the green side of things, this fleece is supposed to be made from post consumer plastic bottles. Not sure what I think of that right now (and too serious a topic for right now), maybe a post for another time.

Wednesday, July 15, 2009

Coloring Rice

Today, my son and I had an incredibly fun lesson in color! I have seen so many recipes online for how to color rice, so I thought what an inexpensive fun activity for a toddler to do while learning about color mixing at the same time. I altered it a little bit but the main idea is to take rice, cheap food color, a little rubbing alcohol and shake it in plastic bags. I don't have plastic bags in the house, so instead we used some of the remaining reusable plasticware with tight sealing lids.

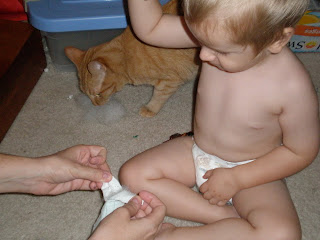
Most sites recommend that only an adult should use the food color, but what fun is that? I kept a couple of rags close by, stripped my son down to his diaper (we would have used an apron or smock if it were not so hot today) and let him experiment and have some creative liberties.

I measured out enough rice to cover the bottom plus about an inch thickness in each bowl. I showed my son how to open the food coloring and how to resecure the lids (this may have been his favorite part).

First we did just single colors:

Adding red food color


The fun part of shaking and mixing the color


Making blue rice


mixing and shaking blue rice


Mixing colors to see what they make - we made a batch of purple rice, then this had almost all the colors in it and made a dark green colored rice.

I put the rice in baking pans for about an hour at 200 F, stirring occasionally. Then we poured the rice into storage jars for use later.

We already used our rice for a transfer activitiy. I took the rice that had spilled on the table while pouring it into storage jars and put it all in one bowl. Then left one of the baking dishes for him to ladle rice from the bowl to the baking dish. This kept him busy for about 45 minutes - just transferring rice from one dish to the other - maybe there should be a Zen rice ladle bowl set for adults.


transferring rice with a ladle

Sunday, July 12, 2009

Reusable Produce Bags

My new empty homemade produce bag!

In an effort to reduce consumption, I decided to make some of my own produce bags to take shopping. Whenever we are at the store, in the checkout lane, I look at these plastic bags of produce or bulk items and wonder why am I filling my cloth shopping bags with lots of little throw away plastic bags. At least the plastic grocery bags I do re-use for kitty litter changes, but these produce bags are so flimsy, they cannot be re-used (at least not in my house for anything I have thought to re-use). I bought a bag from
reusablebags.com, but it was a little pricey for as much produce as I buy, and it seems to be a little burdensome to the cashiers when they have to open the bag to see what the item is so they can ring it up. I have tried training the cashiers that you can see the numbers on the stickers through the bag, but this is just more work than I want for a grocery store trip. So I decided to make my own bag. I can make several for a low cost, I can pick the fabric, and it is a great sewing project for someone needing some practice since I am a newbie at this sewing thing. My favorite color is purple, so I decided to buy some bright purple nylon mesh - very transparent, and quite sturdy. The drawstring is not so pretty, but it is simple unbleached cording. No need for a closure because friction keeps the bag secure.

No pattern needed - just pick the size of bag you want, cut, sew edges, then sew in a hem line so you can insert a drawstring. Tie a knot in the end of the drawstring and you are done. Simple project - pretty bags! My large bag can hold about 4 lbs of apples (pears, peaches, whatever really). And I have made some smaller bags to hold nuts, seeds and legumes. The holes in the netting are small enough that the things I buy do not fall through. I will probably also make a couple out of cheesecloth so I can put things like millet, quinoa, and rice in them too.

You may ask if this is much heavier than the plastic from the stores - I don't know the exact weight difference, but I do now that none of my bags weighs more than 0.1 oz. My calculations for average produce at about $2 per pound means that this bag costs me about one penny on the scale. If I go to Whole Foods, they give me a dime for re-usable bags, so I actually make $0.09 on each bag that I use. Not a bad buy really. I made 7 bags total from 1 yard of fabric which I bought on sale for $0.99. I spent about $2 on the drawstring, and I had the purple thread. This $3 investment will pay for itself within about 30 uses of the bags.

My new produce bag filled with 4 pounds of pink ladies!

Monday, July 6, 2009

Noah's Chocolate Cherry Brownies

Must be something about chocolate and cherries this week in our house. I asked my son if he would like to help make brownies and of course since he is 2 he said he can do it himself. I got to help a little bit. I gave him guidelines and bowls to fill with the ingredients he chose (like which nuts, which fruits, which added flavorings, etc). This was really a fun afternoon and if I hadn't been watching him like a hawk, I would have some pictures to post too. This is what we ended up making:

Raw Chocolate Cherry Brownies - Makes 12 brownies
Ingredients:
1 cup raw pistachios
1/2 cup raw walnuts
1/2 cup raw almonds
1/2 cup raw cacao powder
2 vanilla beans - insides scraped
a pinch celtic sea salt
1 3/4 cups dates, pitted
1/2 cup dried tart cherries, unsweetened
2 Tbs agave nectar

Process nuts, cacao, vanilla and salt in a food processor fitted with the "S" blade to the consistency of a course meal. Add dates and cherries, and pulse until mix starts to come together in a dough. With food processor on, add agave nectar - this should help bind everything as well as sweeten. Press into a brownie or pie pan. Cool in the refrigerator for at least an hour to firm them. Slice into squares or wedges.

Wednesday, July 1, 2009

Black Forest Ice "Cream"


This is incredibly chocolatey and not too sweet. If you prefer more sweetness, you can definitely add more agave or dates. With ice creams, make sure that the pre-ice cream freezer mixture is sweet enough to your liking or even a little too sweet. For some reason, ice creams taste less sweet after they are frozen in the ice cream freezer.

Ingredients:
1 cup raw cashews, soaked for at least an hour in purified water (do not reserve the water)
1/2 cup raw cacao powder
1/2 cup agave syrup or mild date (such as halawi)
20 oz cherries, divided (pitted)
1/2 tsp almond extract, alcohol-free (optional)

Pre-freeze your ice cream freezer bowl overnight.

Take 1 cup of cherries, chop and put in a bowl in the refrigerator. These will be the chips for later. Drain cashews and add to high powered blender along with cacao powder and agave syrup (or dates). Blend on high until thick and creamy and no chunks of cashews are left. This should look like a very thick pudding. Add remaining cherries and blend again until creamy and no chunks. Taste at this point for sweetness. If it is not sweet enough add up to another 1/4 - 1/2 cup of agave or dates. Pour the mixture into a large bowl and set in the refrigerator for at least 6 hours.

Start the ice cream freezer, and pour the chocolate cherry mixture into the freezer. My ice cream takes a total of about 20 - 25 minutes depending on how warm the house is. Check the ice cream after about 10 - 15 minutes. When the mix is starting to set, add the chopped cherries. Adding them at this point will ensure you have an even distribution and that the cherries do not fall to the bottom of the freezer. Let the ice cream freezer run (according to manufacturers instructions) until mix is completely frozen. You can serve and enjoy at this point and the ice cream is like soft serve. Or spoon mixture into a freezer safe container, and freeze overnight so it sets up hard like carton ice cream.

Friday, June 26, 2009

Repurposed Receiving Blankets - Project 3 - Crayon Roll-up

I found a pattern for making a crayon roll-up through Joann's fabrics which was the inspiration for this roll-up. My son has the twistable colored pencils and crayons - my hope was that those would be refillable, but alas just more plastic for the landfill. I wanted to give credit and post a link to the original pattern, but I can no longer seem to find it on their website. Anyway, it called for fleece and novelty patterns and is very cute. I decided to make mine from you guessed it - repurposed fabric. I also had to alter the measurements - I have only 12 pencils for mine and they are quite taller than standard crayons. I used the following:

2 cotton rectangles measuring 7 1/2" x 12 1/2" - this is the front and back material which in mine is the animal print (a repurposed crib sheet)
1 cotton rectangle measuring 10 1/2" by 12 1/2" - this is the pocket folded in half (so I did not have to hem the packet). Mine is the blue pocket which is a repurposed dress shirt of my husbands that is way too big on him now.
1 receiving blanket square measuring 7 1/2" x 12 1/2" - I used this instead of a fusible interface to give the roll some structure. I used a very faint pattern so it would not show through the back of the roll. The only things I bought for this project were a $0.50 roll of ribbon and some ric rac - I have only been sewing for about a month now and need to practice my trims and my edging. Luckily I am more critical than my son and he loves it.


This is the roll halfway rolled, half way unrolled:


All bundled up - view from the top:

And all bundled up on the side:

Thursday, June 25, 2009

Hemp Milk

Ingredients:
1/4 cup shelled hempseeds
1 cup water
1 Tbsp Agave Nectar or 1 medjool date

Directions:
Place all ingredients in the blender and whirl - this takes about 15 seconds in a high powered blender. Flavor with vanilla, honey, almond extract, etc. (if desired) Optional - strain using cheesecloth, a nut/seed bag or very fine sieve.

For a sweet treat - use 1/4 cup hempseeds, 1/2 cup water, and a very ripe frozen banana - tastes like a nutty banana milk shake!

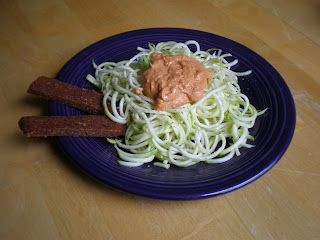
Zucchini Pasta with Creamy Tomato Sauce and Flax Bread Sticks

This may be my sons favorite meal. I was making the zucchini noodles for me and some gluten free packaged pasta for him. After he saw what I had, he asked for "mommy noodles" and would much prefer these over packaged pasta.

Zucchini Pasta with Creamy Tomato Sauce
Ingredients:
Pasta:
1 zucchini per person - spiraled with a vegetable spiralizer or you can use a vegetable peeler to make fettucini style noodles.

Sauce:
1/2 cup cashew chreese
1 cup sun dried tomatoes, soaked for 1 hour (reserve soaking liquid)
1 large tomato
1 Tbls dried Italian herbs (I use a mix of basil, oregano, parsley, sweet fennel, and parsley)

Put all sauce ingredients in high powered blender and whirl until desired thickness. I prefer this to be smooth without any chunks. If it is too thick, add some sun dried tomato reserve liquid. If it is just right, then you can discard the reserve liquid.

Place zucchini noodles on a plate, top with a large spoonful of sauce. Top with parmezano if desired, and flax bread sticks. Serve right after plating otherwise the zucchini starts to release a lot of water and this will make for a soggy plate. Sauce is fine to keep as a leftover and will store for up to 3 days, but make the noodles fresh each time and right before dining.

No Mother Left Behind