Search This Blog

Friday, June 26, 2009

Repurposed Receiving Blankets - Project 3 - Crayon Roll-up

I found a pattern for making a crayon roll-up through Joann's fabrics which was the inspiration for this roll-up. My son has the twistable colored pencils and crayons - my hope was that those would be refillable, but alas just more plastic for the landfill. I wanted to give credit and post a link to the original pattern, but I can no longer seem to find it on their website. Anyway, it called for fleece and novelty patterns and is very cute. I decided to make mine from you guessed it - repurposed fabric. I also had to alter the measurements - I have only 12 pencils for mine and they are quite taller than standard crayons. I used the following:

2 cotton rectangles measuring 7 1/2" x 12 1/2" - this is the front and back material which in mine is the animal print (a repurposed crib sheet)
1 cotton rectangle measuring 10 1/2" by 12 1/2" - this is the pocket folded in half (so I did not have to hem the packet). Mine is the blue pocket which is a repurposed dress shirt of my husbands that is way too big on him now.
1 receiving blanket square measuring 7 1/2" x 12 1/2" - I used this instead of a fusible interface to give the roll some structure. I used a very faint pattern so it would not show through the back of the roll. The only things I bought for this project were a $0.50 roll of ribbon and some ric rac - I have only been sewing for about a month now and need to practice my trims and my edging. Luckily I am more critical than my son and he loves it.


This is the roll halfway rolled, half way unrolled:


All bundled up - view from the top:

And all bundled up on the side:

Thursday, June 25, 2009

Hemp Milk

Ingredients:
1/4 cup shelled hempseeds
1 cup water
1 Tbsp Agave Nectar or 1 medjool date

Directions:
Place all ingredients in the blender and whirl - this takes about 15 seconds in a high powered blender. Flavor with vanilla, honey, almond extract, etc. (if desired) Optional - strain using cheesecloth, a nut/seed bag or very fine sieve.

For a sweet treat - use 1/4 cup hempseeds, 1/2 cup water, and a very ripe frozen banana - tastes like a nutty banana milk shake!

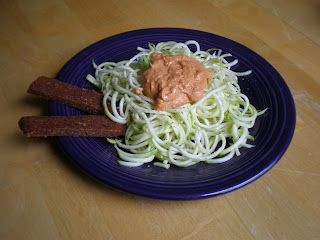
Zucchini Pasta with Creamy Tomato Sauce and Flax Bread Sticks

This may be my sons favorite meal. I was making the zucchini noodles for me and some gluten free packaged pasta for him. After he saw what I had, he asked for "mommy noodles" and would much prefer these over packaged pasta.

Zucchini Pasta with Creamy Tomato Sauce
Ingredients:
Pasta:
1 zucchini per person - spiraled with a vegetable spiralizer or you can use a vegetable peeler to make fettucini style noodles.

Sauce:
1/2 cup cashew chreese
1 cup sun dried tomatoes, soaked for 1 hour (reserve soaking liquid)
1 large tomato
1 Tbls dried Italian herbs (I use a mix of basil, oregano, parsley, sweet fennel, and parsley)

Put all sauce ingredients in high powered blender and whirl until desired thickness. I prefer this to be smooth without any chunks. If it is too thick, add some sun dried tomato reserve liquid. If it is just right, then you can discard the reserve liquid.

Place zucchini noodles on a plate, top with a large spoonful of sauce. Top with parmezano if desired, and flax bread sticks. Serve right after plating otherwise the zucchini starts to release a lot of water and this will make for a soggy plate. Sauce is fine to keep as a leftover and will store for up to 3 days, but make the noodles fresh each time and right before dining.

Repurposed Receiving Blankets - Project 2 - Menstrual Pads

I have purchased Lunapads in the past and I really could use a few extras. These are more like pantyliners than true pads. I just realized that I did not take a finished product picture - but took a couple along the way pix.

I made a pattern from one of my existing lunapads and added about 1/2 inch to the length of it because being almost 6 ft tall, I need a little more length there too :) I took the scraps from the diaper project and cut out enough fabric to make 2 pads - 2 large pieces that include the wings.

And the absorbent layer made from one layer each of receiving blanket, and shop towel. I then sewed the two layers together (the shop towel and the receiving blanket) right sides together, then turned them inside out, and top stitched the opening. Then I sewed this pad into the large pad with the wings and added velcro to the wings to secure. This is technically a reversible pad because it can be worn with either side up, and the velcro will secure either way as well.


Diaper Pail Deodorant Discs

The deodorizer discs are working, and not just for the diaper pail. I stuck one behind the kitty litter box (for 2 kitties) and the discs are working tremendously there too. So here is the "recipe" for making your own deodorant discs.

Ingredients:
2 cups Baking Soda
1/2 cup water
10 drops Tea Tree Oil
10 drops Lavender Essential Oil (EO)
(I suppose you could use 20 drops of some other EOs but I am going for the properties of these oils)
Hardware -
2 glass bowls
a spoon
1 12 muffin tin - I say tin, but I only have a silicone one. If you use tin, I would line the pans with something to make it easy to get them out later, like silicone liners.


Directions:
Pour 2 cups of baking soda in a bowl. Mix water and EOs together in a separate bowl. Add water and EOs to the baking soda and mix until well incorporated.

The mix should be like wet sand, but not too wet - you just need it to clump so you can put it in the muffin pan.
Take approximately one large spoonful of the mix in each cup of the pan. Press the mix into the cups. I had my 2 year old do this job and he loved it - mashing a cup into the pan forms.

Set the pan in an area that will not be disturbed and is not very humid for about 24 hours. Remove the discs from the pan and place in the bottom of garbage pails, or anywhere you need a little extra deodorizing power.

These discs are a little fragile so handle with care. If they stop working - you no longer smell the pleasant smell of the oils, then you can always add a few drops of oil to the disc to refresh it. I am storing the extras in a glass container (so the oil is not absorbed into a plastic container) and in the back of the pantry so they are not jostled too much.

Tuesday, June 23, 2009

Diaper Pail Woes

I have been having a battle with my garbage pail for what seems like an eternity. I have a liner in the pail, but I guess boy pee is just made to be super potent ammonia smelling. Maybe girl pee smells this bad too, maybe it is just toddler/baby pee but I can't seem to get the smell out of the pail. I wash diapers about every 2 days or so, I was the liner, and I wash the pail, then I leave it out in the sun most of the time to dry hoping the sun will bake the smell out - maybe the sun is baking the smell in. Then I throw about a quarter of a cup of baking soda in the bottom, and a few drops of tea tree oil. Back goes the liner, and we are off for another few days. Now mind you, this is not a cloth diaper issue - when we used disposables, we had the same problem, and moved the garbage can out to the garage. I don't want to move my cloth diaper pail into the garage. This cleaning method is just not working to my satisfaction, so I have tried something else - I really hope this works better. I made my own deodorizer "cakes" today from baking soda, water, tea tree oil and lavender oil. I mixed everything up, mashed it into a muffin tin, and set them out to dry. It should only take about a day for them to cake up. This way, I can put a cake in the bottom of the pail, as well as in the top of the little ball where you are supposed to put some sort of chemical deodorant that the company who makes the pail sells.

I took pictures - if it works after 2 days, I'll post the pix and the exact recipe.

Thursday, June 4, 2009

Orange Banana Smoothe - Post Running Smoothie

Everytime I finish a run, I crave this smoothie.  I always keep about 5 peeled bananas in the freezer to add to smoothies - this is a great reason to do that.

Ingredients:
2 frozen bananas
3 medium oranges, peeled

Place all ingredients in high powered blender and whirl until creamy and smooth. Makes approx. 1 quart of smoothie.

Pina Colada Green Smoothie

This is my son's favorite smoothie and we split it every morning for breakfast.

Ingredients:
1 large banana
4 cups of spinach
1/2 a large pineapple
1 Tbls coconut oil

Put all ingredients in a high powered blender an whirl until creamy and smooth.  This makes abut a quart of green smoothie.

Tuesday, June 2, 2009

Why Do You Like to Break Your Toys?

For the last couple of months, we have been giving our son toys that he immediately dismantles.  This started happening just before he turned two.  At his 2nd birthday, he did receive quite a few presents, and many which could easily be "broken."   They are not really broken because they are easily repaired.  We have even set up a toy hospital in our office.  I did not want to come right out and ask "Why do you break your toys?" for fear of the accusational tone, as well as really hating to ask why questions ever of anyone - do any of us really know why we do things especially when we are put on the spot.  How presumptuous of me to assume that he really is breaking his toys.

Finally, one day, as we were playing in my son's room, and he had dismantled most of his toy cars, I said, "It sure seems like you enjoy taking apart your toys."
His response "I do, mommy, I really do!"
"What is it that you like about taking apart your toys?"
"Learning to fix them and build them!"

I thought, "oh what I wouldn't do for an old fashioned erector set!"  My family happened to be at IKEA the next day where we picked up a BYGGA - the Swedish version I guess of an erector set.  We took it home and learned how to build a motorcycle from the set.  

My son is learning to build things, and I am learning to assume that children have the best intentions at learning (not destructing).

No-Poo Update

I love my no-poo hair!  It has been over a month of very light experimentation.  I figured out in the first week what works best for me is either every 2 or 3 days putting about 2 tsp of baking soda in a cup with about 1/2 cup of water and pouring that over my head to massage in is the best method, for me.  I also have figured out that too many ACV rinses can leave my hair kind of greasy whereas no ACV rinses leave it full of static electricity, but only if I use the hair dryer.  I tried lemon juice as a rinse and love how soft it left my hair.  The only problem was I did not strain it, and I had lemon pulp in my hair for two days.  So, my conditioning routine is now only weekly, and using strained lemon juice.  The other benefit to the lemon juice is it provided some control to my hair like a mousse would.  I have not used any hair products like hairspray, gel or mousse either since May 1.  I could, but I don't feel any need.  At this point, I see no reason to turn back to shampoo.

Repurposed Receiving Blankets - Project 1 - Contoured Baby Diaper

I had (who am I kidding - have) several piles of receiving blankets ready to go before my son was even born.  I had no idea what they were for, but everyone (really.. everyone!) with a child told me you can never have enough receiving blankets.  I started to wonder after he was born if this is just some joke other moms play on new moms or moms to be to see how many blankets a new mom will collect.  I never found a use for them as a blanket or otherwise.  

When I started cloth diapering, I realized how silly it is to CD, but then use disposable wipes.  So off to the stash of receiving blankets I went with my pinking shears to make my own wipes.  5 blankets later, and I have plenty of wipes that have lasted over 2 years now.  I still have a large cloth grocery bag full of receiving blankets and now what do I do?  

Project 1:  Make my own contour cloth diapers

This weekend, I made my own pattern from one of my favorite pocket diapers and created a very cute reversible contour diaper.  I have just recently begun sewing so this is a relatively simple project that anyone can do.  I used 2 blankets, and 1 microfiber shop towel from a stash I bought a couple of years ago when we gave up papertowels.
  1. Line up 2 blankets.  Fold the blankets in half (or thirds).  Line up the long edge of the pattern on the fold of the blanket.  You should now have an outer layer and an inner layer.  This is a contour diaper and will need a cover so it is okay that both inner and outer are absorbable material.
  2. Cut out the soaker - I used a shop towel cut into a strip 4" wide by about 15" long.  
  3. Sew the soaker layers together - I didn't bother turning them inside out on this one - I figure it is inside the diaper where no one sees so it should be okay, and it didn't seem to feel uncomfortable through the other layers, so I think it is okay with my son too.
  4. Lay the soaker layer inside one of the cutout blankets and line up so the center of the soaker runs down the center of the diaper and is about one inch from the bottom of the diaper.
  5. Top stitch the soaker layer in place.
  6. Lay right sides of the blankets together and sew together leaving about 3 inches on the top side so you can turn the diaper right side out.
  7. Turn the diaper right side out, then fold under the opening.  Sew together.
  8. Voila! Contoured baby diaper!  I did not do it on this pictured one, but I will be modifying it after the next wash cycle.  I am going to go back and sew down the center of the soaker to reinforce the stitches and hold it together on both sides.  I am also going to reinforce the edges by doing a top stitch around the entire diaper.

Parmezano

This is more of a condiment recipe, but it is very versatile in application and incredibly simple to make.  Use it anywhere or in any recipe calling for Parmesan Cheese.

Ingredients:
1/2 cup raw nuts or seeds - I prefer the flavor of raw pine nuts
1/2 cup nutritional yeast flake - if you can only find powder, then use 1/4 cup
1/2 tsp garlic powder
a pinch of sea salt

Put all ingredients in food processor and pulse until nuts are the texture of sand.  If you have a high powered blender (like a Vita-mix) this takes about 20 seconds to make.  Make sure you do not over grind, or you will get a nut/seed butter.  

This is technically a raw transition food - some raw foodists treat nutritional yeast as a raw food, and others do not.  It is up to you but right now it is part of my raw diet and is also enjoyed by my husband and son who are not on a raw diet.

We use this to top pizza, pasta, baked potatoes, popcorn, raw veggies, etc.  

No Mother Left Behind